
|
Training for Mountaineering Most mountaineers are goal-oriented individuals. They are in search of a physical and mental challenge that will push their limits, including everything from sleep-deprived alpine starts, carrying heavy loads, loss of appetite, rock and ice climbing in thick boots, extreme weather temperatures, and the ability to stay flexible and positive. As a guide, I have seen many folks show up to the trailhead without training at all for the planned trip. The only element of mountaineering that can be controlled is training and preparation. Hard work and dedication to training will add depth to your mountaineering success.
This article outlines the approach to completing a training program for a standard 3-day mountaineering climb, with approximately 7000 feet of elevation gain, carrying a 40 lb pack (comparable to climbing Mount Rainier or Mount Shasta). The training program will consist of strength training, cardiovascular endurance training, and the requisite mental training it takes to complete the program. This type of 3-day climb requires an average of 10 hours of training per week for approximately 16 weeks. The time is divided for 2-3 strength workouts, cardiovascular training, and long hikes on the weekends with a pack. If you have a restricted schedule due to work commitments, it will require extra logistics planning to ensure that you can complete workouts, taking into account considering drive time to and from your workplace. Ascending a mountain uses different muscle groups than descending. Your strength training should incorporate a balance of upper body, lower body, core and balance. My training programs for the inexperienced mountaineer typically target all the major muscle groups first and then proceed to focus on any muscular imbalances that may arise. A certified personal trainer who can advise you in-person can be a powerful tool in helping an aspiring mountaineer define these specific areas and focus their training to strengthen them. In addition to boosting overall fitness, strength training will prepare you for crossing streams, walking on snowy slopes, tackling low angle glacier terrain, and hiking on talus. The strength training should focus on glute strength (including such exercises as lunges, squats, single leg deadlifts, bosu training, and step downs). Upper body exercises, such as standing rows, lat pull downs, shoulder internal & external rotations, and rear delt raises, will also strengthen the back and prepare it for carrying weight. Further, strength training can incorporate a lot of balance, by practicing cable rows while standing on an unstable surface, doing pushups on half foam roller, and bicep curls while standing on one leg. Cardiovascular training will be necessary throughout the training program. The majority of my training programs incorporate only the activities and equipment that are accessible to the client, for this reason I often prioritize cardiovascular training that can be completed outside. In my own life, I find that cycling, swimming, trail running, and hiking with a pack on are all accessible cardiovascular activities that I can squeeze into my schedule without a ton of preparation or emphasis on equipment. On days when the weather is terrible or you experience unexpectedly difficult time management; you can be creative with what you can do in the gym. The Versaclimber (a standing climbing simulator that many gyms will have on their cardio floor), spin classes, group exercise and full body conditioning, and running on the treadmill are all great options for improved. by Lynette Talbott
ACSM Certified Personal Trainer
|
INTERNATIONAL ALPINE GUIDES BLOG

|
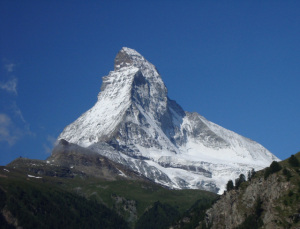
So you want to climb the Matterhorn. What does it take? Not many peaks in the world are as iconic and recognizable as the famous peak straddling Switzerland and Italy know by the Swiss as The Matterhorn. So it stands to reason that climbing the Matterhorn is a major goal of many climbers. But what does it take to scale this famous peak? We will take a look at what it takes to climb the Hornli Ridge from Zermatt, Switzerland, by far the peak’s most popular route.
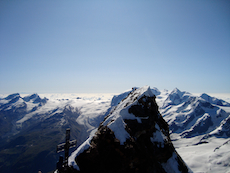
A climb of this nature is not easy to describe to climbers who have not been to the Alps. A common question is “What is it rated”? The answer to that question is probably 5.4 in the US rock rating system. However, that doesn’t even begin to tell the whole story. The Matterhorn is a classic alpine rock climb with some snow and ice near the top. This means you must climb it in lightweight alpine climbing boots and sometimes with crampons on. This of course adds to the difficulty and can take some getting used to. The day starts usually around 4am at the Hornli Hut at an elevation of 10,600 ft and the summit is at 14,692 ft. That means there is approx. 4000 ft of steep climbing to be done in less than 10 hours. Most of the Hornli Ridge is probably 3rd & 4th class scrambling with occasional sections of easy 5th class. There are even some vertical fixed ropes which must be climbed hand over hand. The climbing is relatively easy for those with rock climbing experience, but very exposed. When with a guide, you are moving roped together without an anchor for much of the route. As with many peaks, you want to be done and back at the hut by mid afternoon at the latest, so you can see that speed is of the utmost importance. There are no real breaks on the climb. The way down is the same way you go up and it’s not really any easier. It’s go, go, go for 8-10 hours. The need for speed, the sustained nature of the climbing and scrambling, as well as the altitude all combine to make the Matterhorn a very athletic endeavor. Being in excellent cardio shape is key to success. Having rock climbing scrambling skills are also key, you must be sure on your feet! Also, the exposure is massive. We are talking 4000 foot sheer drops down to the glacier. You must be comfortable with exposure. And of course, you must be acclimated before attempting such a climb above 14,000 ft. In the years that I have been guiding the Swiss Matterhorn, I’ve seen 5.10 rock climbers with no previous Alps experience struggle. I’ve also seen veteran peak baggers in great shape and with good scrambling skills, but with no real technical rock experience, do great. All said the Matterhorn is not an exceptionally difficult alpine climb if attempting with a guide (route finding can be tricky if attempting on your own). It just requires excellent physical shape and a skill set that allows you to move fast and efficiently on exposed rock. Conditions are always a concern when planning a Matterhorn climb. Since the Matterhorn is primarily a rock climb a summer snowstorm (not uncommon in the Alps) can put the route out of shape for climbing. Snow covered rock makes the route just too dangerous and slow going to attempt reasonably. Some snow may be ok but too much and you might as well set your sights on one of the other fantastic alpine climbs in the Zermatt area. The picture shown above is the Matterhorn in summer, but clearly out of shape for climbing. All in all, the Matterhorn can be one of the more memorable days of your climbing career! by Dave Miller IAG/CAG owner/director and IFMGA internationally certified mountain guide |
|
Gear Tip: Klean Kanteen Insulated Bottle I like equipment that serves more than one purpose. I’ve found that in the Klean Kanteen insulated bottle. It’s my extra water bottle, my camp mug and my thermos all in one.
It’s a double walled bottle, not a thermos. The big difference here is that it holds more liquid for it’s size. No, it’s not quite as insulated as a thermos but I still seem to have hot tea 4 hours into a cold high altitude climb. The 16oz size also makes a perfect camp mug. They even sell a mug top for it separately, but I don’t see the need for it personally. Sometimes I only really want to carry 1 ½ liters of water on a climb so the 16oz insulated bottle is perfect along with one of the non-insulated one-liter bottles. Klean Kanteen makes a full line of metal bottles that are a safe BPA-free alternative to plastic bottles. Check them out at: Klean Kanteen by Dave Miller IAG/CAG Director
|

|
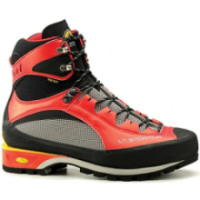
Is there one mountaineering boot to do it all? The short answer is, well, not really. The problem is that the mountaineering boot you want to climb, say, the Swiss Matterhorn is an entirely different style of boot than you want to climb Denali in Alaska. The Matterhorn is climbed quickly in moderate temperatures and involves a lot of steep rock climbing in addition to some snow and crampon work and for that you need a lightweight mountaineering boot that has some sensitivity for the rock sections but can still take crampons for the upper snow and ice sections. Denali is a cold and high Alaskan peak where the only climbing movement is walking upright on snow and ice. This requires a very warm, highly insulated boot where sensitivity is not a concern. If your goal is to be an all round mountaineer and alpine climber you will need a quiver of mountain boots. Two boots will suffice for most situations, but three boots would cover just about all your bases. A mountain boot would be loosely defined as a climbing boot that has a stiff lug sole for climbing snow and ice and is suitable for use with crampons. Following is a description of three basic mountain boot designs and their uses. The lightweight summer alpine climbing boot This is the nimble boot you use for fast and light summer climbs in the Sierra Nevada of California, The North Cascades of Washington State, The Alps of Europe and any other place where the temps during the day are above freezing but where you may encounter snow and ice in addition to rock sections.
These are stiff leather boots with lug soles and little to no insulation. Most are waterproof with waterproof/breathable linings and they will take a strap-on or semi-automatic crampon without a toe bail. They breath well and are much lighter than other alpine boots which make them great for those long trail approaches and more technical rock sections. However, they just don’t have the insulation you need when the temps get well below freezing. Examples are the La Sportiva Trango GTX, The Scarpa Charmoz GTX and the Garmont Tower GTX, among others. The high altitude double plastic boot This is the big daddy of the mountaineering boot world. They are built for warmth, period. This is a big clunker of a boot that you need for those cold, high altitude climbs in Alaska, the Himalaya and some parts of South America such as Aconcagua. They are also an excellent choice for mid-winter and early spring mountaineering in the lower 48.
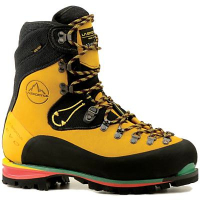
They feature a removable liner and plastic or plastic/synthetic leather outer shell. The removable liners are key which allow you to dry them out and keep them warm in a sleeping bag at night. They are highly insulated which can keep your feet warm, but reduces their sensitivity and makes them a poor choice for more technical climbing in warmer temperatures. Some plastic boots are warmer than others and some come with built in overboots for the most extreme high altitude and cold conditions such as the 8000 meter peaks of the Himalaya. Examples would be the La Sportiva Spantik, The Lowa Civetta and the Scarpa inverno, among others. The all rounder The boots above will get you by in most mountaineering situations, but if you really want the full quiver you will want that in-between workhorse boot. These boots are usually leather or synthetic leather, have some insulation for below freezing temps but they manage to keep the weight down for when the terrain gets a little technical. They do not feature a removable liner and many of them come with a built in zippered gaiter. This is boot you want for technical ice climbing in all but the coldest temps, for summer mountaineering on big mountains such as Rainier, Mont Blanc or California’s Mount Shasta.
While you may ask, “why not just go with one pair of all-rounder boots?” Good question. However, when you get on technical rock in warmer temps you may find yourself struggling a bit. The same would be true on a long approach. On the other side of the spectrum, you’re asking for big trouble and perhaps a few missing toes if you try to use these boots on Denali or a 6-8 thousand meter high altitude climb. Examples of these boots are the La Sportiva Nepal EVO, The La Sportiva Batura and the Scarpa Phantom.
There are other alpine climbing footwear choices such as technical rock shoes, low-top sticky rubber approach shoes and even running shoes, but these don’t really fall into the alpine climbing or mountaineering category where crampons may be required. It is not unheard of to approach a climb with mountaineering boots and then switch to your rock shoes for the technical 5th class rock climbing. It is far less common, and not usually a good idea, to approach a colder climb with lightweight footwear and then switch into a heavier boot. You are just carrying all that extra weight with the 2nd pair of footwear. An exception to that would be a long expedition with a trekking approach but usually someone, or something, else is carrying all your gear to basecamp. And finally, fit is a major concern with any footwear. Within these categories whatever fits your foot the best is the right boot for you.
by Dave Miller |

|
International Alpine Guides New Blog! Welcome to IAG's new blog. Here you will eventually find tons of useful information on the world of mountaineering, ski touring and trekking as well as trip reports, updates and current news. Our goal here is to provide you with entertaining and useful information to help you plan your next mountain adventure, whether it is with us or on your own. No hard selling a guided trip to you, just great information. Stay tuned and keep checking this space. We are excited to provide this resource for all your mountain adventure needs! |
 |
