|
Tips & Techniques: Escaping the Belay Picking up where we left off, this week we’re highlighting a technique that is similarly useful to know on the occasion you are adventuring off the ground on a multi-pitch alpine route, mountaineering across glaciated terrain or climbing in a single pitch environment. Escape the Belay
Scenario: Leader takes a fall. The rope has been fed out past the halfway point or lowering the Leader would put them father away from you, the Belayer, and the anchor. The Leader’s full weight is being held by your break hand and your belay device attached directly to your harness. The first objective is to free your hands; next, transfer the Leader’s load to first a friction hitch; then, transfer the load from the friction hitch to the anchor.
Tools: Munter/Mule/Overhand combination, Friction hitch: Prusik or Klemheist
Equipment: 6-7mm 20’ Cordalette; 2 locking carabiners
1. Tie off Belay
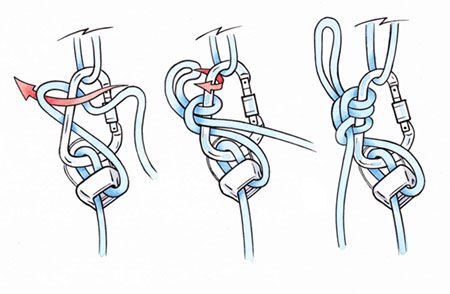 Off of the back end of your brake hand i.e. hand that is holding/breaking the fall, pull a bite of rope through the belay device, and tie off the bite with a Munter onto the locking carabiner.
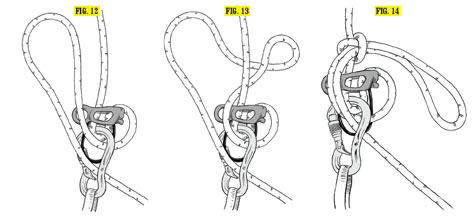 Photo courtesy of Climbing.comAlternately, you can tie off the Munter hitch onto the load strand above the belay device (fig 15-17). Photo courtesy of Climbing.comAlternately, you can tie off the Munter hitch onto the load strand above the belay device (fig 15-17). This step frees your break hand for future tasks.
2. Friction Hitch on Main Load Strand
Using your cordalette, place a friction hitch on the Main Load Strand (rope that is going from your belay device to Climber) at a location within arm's distance of yourself and the anchor.
I like using the Klemheist as a friction hitch here, however the Prusik would work just as well. Your preference.
Secure the back end of the cordalette to the anchor using a Munter/Mule combination on a locked carabiner, then tie an Overhand knot to make the Munter/Mule catastrophe-proof.
(If you tie your cordalette with a double fisherman's knot, this would be the time that you regret using that knot as it will invariably get in the way in all applications of rescue. However, if you tie the cordalette with a water knot, you may wish to maneuver the knot to be close to the friction hitch/load strand or close to the end of the cordalette. Even better is to use an unknotted cordalette.)
3. Back-up Friction Hitch
On the back end of your belay device/Munter tie off (Step 1), secure the rope to the anchor using a Munter/Mule/Overhand combination onto a locked carabiner, making sure that the rope is underneath the friction hitch cordalette. This system backs up the friction hitch in case of catastrophe.
4. Transfer load to Friction Hitch
Slowly lean towards anchor and friction hitch, unweighting your belay device, watching to ensure that the friction hitch is able to hold the entire load. If the friction hitch is solid, you’re clear to untie the Munter and remove the rope from your belay device.
Now, a large amount of slack will have built up between the friction hitch and the Main Strand Munter/Mule.
5. Tighten Main Strand Munter/Mule
On the main strand Munter/Mule, untie overhand and mule knots, pop the Munter, remove the slack, and retie the Mule/Overhand.
6. Transfer load to Main Strand Munter/Mule
Slowly maneuver the friction hitch closer to the anchor, which will transfer the load to your main strand Munter/Mule.
This completes the load transfer onto the main strand Munter/Mule. From here, you're hands are free to execute whatever future steps required, such as rescuing the car keys from your clumsy partner, rappelling down, and grabbing a beer. Pfew, close call!
Next up, Be the Best Belayer Ever! |


International Alpine Guides Blog, News and Articles
Guiding the mountains of the world since 1979

PH: 877-686-2546 (MTN-CLIMB)
EMAIL: info@InternationalAlpineGuides.com
Po Box 1461
Mammoth Lakes, California 93546
When in Mammoth Lakes please visit Mammoth Mountaineering for all your outdoor needs:

When in Truckee please visit The Backcountry for all your outdoor needs:
Copyright © 2025, International Alpine Guides. All rights reserved.
International Alpine Guides, California Alpine Guides LLC & Alpine Skills International provide mountain guides, ski tours, mountain climbing, guided treks and rock climbing in the United States & throughout the world and under special use permits from Yosemite National Park, Sequoia/Kings Canyon National Park, Lassen National Park, Inyo National Forest, Humboldt/Toiyabe National Forest, Shasta/Trinity National Forest, Eldorado National Forest & the Tahoe National Forest
California Alpine Guides LLC & International Alpine guides also operates under the DBA of Alpine Skills International.
“In accordance with Federal law and U.S. Department of Agriculture (USDA) civil rights regulations and policies, this institution is prohibited from discriminating on the basis of race, color, national origin, sex, age, disability, and reprisal or retaliation for prior civil rights activity. (Not all prohibited bases apply to all programs.) Persons with disabilities who require alternative means of communication for program information (e.g., Braille, large print, audiotape, American Sign Language, etc.) should contact the responsible State or local Agency that administers the program or USDA’s TARGET Center at (202) 720-2600 (voice and TTY) or contact USDA through the Federal Relay Service at (800) 877-8339. Additionally, program information is also available in languages other than English. To file a complaint alleging discrimination, complete the USDA Program Discrimination Complaint Form, AD-3027, found online at http://www.ascr.usda.gov/complaint_filing_cust.html, or at any USDA office or write a letter addressedto USDA and provided in the letter all of the information requested in the form. To request a copy of the complaint form, call (866) 632-9992. Submit your completed form or letter to USDA by: (a) mail: U.S. Department of Agriculture Office of the Assistant Secretary for Civil Rights, 1400 Independence Avenue, SW, Washington, D.C. 20250-9410; (b) fax: (202) 690-7442; email: program.intake@usda.gov.” “USDA is an equal opportunity provider, employer, and lender.”
Site Design: www.sharpenddesigns.com