

Ice Axes and Crampons - An In-Depth Look
/The symbol of the mountaineer has always been the ice axe. Regardless of any other equipment that the mountaineer may carry the ice axe is always a close companion held in the hand ready to be employed at a moment’s notice. An early version of the ice axe was called the alpenstock, it was originally invented by herder’s and other mountain travelers around the mid to late 1800’s. Contrary to the ice axes of today, the alpenstock had only a spike at the bottom and a long shaft that could extend above the user’s head. The spike was plunged into the ground or ice and the user would push on the shaft to give themselves stability as they moved along the terrain.

The classic picture of an Alpenstock in action.
Originally, the alpenstock would be paired with a smaller tool that would be akin to a hatchet or what a modern-day climber would call an “ice hammer.” This tool would be primarily use to cut steps in firm or icy snow. Over the decades these two tools were combined and slowly morphed into an axe that would be a closer resemblance to modern day.
Crampons can trace their roots all the way back to the 16th century, when yet again the herder’s and other mountain travelers of the time decided to attach four points to their feet for more traction on the firm snow or ice. This design remained mostly unchanged until the early 1900’s when Oscar Eckentein created the first ten-point crampon. In the 1930’s Laurent Grivel added two front points to the crampons, and in doing so made the first twelve- point crampons.

Old version of crampons- without front points- and an example of footwear the would be worn.
With the evolution of these two products underway throughout the 20th century so too did the designs and technology of construction, and with the passing of iteration and innovation we find ourselves at the product of the current day. Many, many different types of crampons and ice axes exist and it can be overwhelming to decipher the models one sees hanging on the wall of the gear shop. In the past one ice axe did the job, and climbers would take that one axe up every climb they did. Nowadays, in order to have the best chance of success on a mountain climb, the climber has to understand the pros and cons, and match those considerations with the tools for the terrain they will be on.

My collection of axes: Right to left: CAMP corsa Nano, Black Diamond venom, BD cobras, BD reactors, Petzl glacier literide, Petzl sum’tecs, BD venom LT, Petzl gully.
Types of Ice Axes: Like many other things in climbing there are many different ice axes for different terrain you will find in the . The days of using one axe for absolutely everything is over, and the modern climber often will have a quiver of different tools for their objective. If one is climbing a simple glacier route they would opt for a more strait shaft walking style axe, for those looking to climb vertical ice pillars they would need a pair of specific ice climbing axes, and a technical mountain route would require possibly two different types of axes to climb.
Parts of the axe: All ice axes share many of the same pieces, though some may have slight differences model to model. For example, a non- technical axe and a technical axe both have a shaft, but the technical axe’s shaft has a curve to it.
A- Head- the entire top of the axe including the pick and a hammer or adze.
B- Pick- the pointy part that goes into the ice or snow
C- Adze- a shovel type feature found on the other side of the pick
D- Hammer- a hammer feature found on the other side of the pick
E- Shaft- the tube of metal that extends down from the head
F- Spike- the sharp end at the bottom of the shaft for purchase on firm snow or ice
G- Pinky rest- found on more technical axes, a slidable finger rest for better grip on the axe when swinging into ice.

Basic vs. technical: Ice axes have two different classifications for the head and the shaft. These are either “B” for basic or “T” for technical. The main difference between these two are in the materials, construction, and features. The basic ice axes are designed for standard non- technical mountaineering routes. These ice axes are also referred to as “walking axes,” because they are essentially made as a cane for maintaining balance when walking through rough snowy, icy, and glaciated terrain. A few years ago, everyone would size these ice axes measuring off of a body part, i.e., they wanted the spike to be as low as their ankle. The more modern approach is to use a shorter ice axe which makes for better use in self arrest and doesn’t allow the spike to jut far above the user’s head when walking through a brushy area. Additionally, when side hilling, an ice axe that is too long will push the user away from the slope and make it harder to balance. The newer method of using one ice axe and one trekking pole in the other hand solves this problem. On flat ground the user will hold the ice axe in one hand while the trekking pole mains the third point of balance. When the terrain becomes steeper and more consequential, the pole is put away and the ice axe is used as the third point of balance.
Technical ice axes are used for steep snow and ice climbing. While the primary use of a basic ice axe is for self-arrest and walking up a snowy slope, a technical axe is primary built for climbing. There is a much wider range of technical axes than basic ice axes to help climber’s pick the best ice axe for the terrain they plan on climbing. Some ice axes, like the Petzl Sum’tec, are fully technical rated, but they have a more stripped down design to make them more of an all- around mountain tool. Easy enough to use while walking on a glacier, but still technical enough to climb easy water ice with. While on the other end of the spectrum you have the Petzl Ergonomic, this is an ice axe made only for technical hard ice climbing and dry tooling. It doesn’t have a spike on the bottom so you will not be able to use it in “cane” mode like a basic ice axe, and the shape of the shaft make self-arrest extremely uncomfortable and maybe even impossible.
Some ice axes will have a “B” or “T” stamped onto the shaft and or pick, but the easy way to tell the difference is any shaft that is striate will be a “B” rated shaft. Any ice axe with a “B” rated shaft will have a “B” rated pick. Any ice axe with a curved shaft will be a “T” rated shaft, but not all axes with a “T” rated shaft have a “T” rated pick. A “B” rated pick will the thicker than a “T” rated, and the teeth will not be as sharp as a “T” rated pick. “T” rated picks also have a sharp cutting edge on the top of the pick, this is to make it easier to pull the pick out of ice after being swing into it, “B” rated picks are dull on the top. The final obvious difference is “T” rated picks have more of a curve to them, whereas “B” rated picks have a gentle down slope from the top of the head to the tip of the pick.
Disclaimer: When selecting an ice axe do not just focus on weight. Some extremely light weight ice axes exist and are made by many companies. However, these axes can break and often cannot stand up to the rigors of real mountaineering. The ice axe is an important enough tool that one must have some weight in order for it to work properly.

Examples of a basic, all mountain, and a fully technical axe. Left to right: Petzl glacier literide- fully basic ice axe, Petzl Sum’tec- fully technical but still has attributes of an all-mountain axe, this axe can handle easy climbing but still allows for use in more basic axe terrain. Black Diamond Reactor- example of a fully technical climbing specific axe, it can climb at any level of technicality, but doesn’t walk well at all.
What axe should I use: This is the question mountain guides have been asked for centuries now.I like to think about the terrain in which I’m going to use the ice axe. If I’m doing a non- technical mountaineering route, like the Coleman- Deming on Baker, Emmons on Rainier, or climbing routes up Mount Shasta like Avalanche Gulch or West Face Gully. I’m going to use a basic ice axe. The routes are mostly comprised of terrain when my axe will just be used for balance and self- arrest. I want an axe that is comfortable to hold from the top of the head and I can dive deeply into the snow if I need to. My choice of ice axe for this terrain is the Petzl Glacier Literide.
Climbs of a more technical nature, such as the U-notch and the V-notch couloirs in the Palisades of the Sierra, or many climbs in North Cascades National Park. I’m going to use a fully technical rated axe that still is good for general glacier and snow travel. There are many tools that fit this bill on the market, my choice is the Petzl Sum’tec.
Finally, on the most demanding vertical ice climbs, I need a true ice climbing tool that is built for that specific purpose. These would be the best choice for anyone looking to take ice climbing courses and who want to climb vertical waterfalls and super technical alpine climbs. My choice for this task is the Petzl Nomic.
Types of Crampons: Similar to ice axes there are many different crampons for different terrain types, however the big difference with crampons is you must have a boot that is compatible with your crampon. This article is not about mountain footwear so be sure to do your research and ask questions to make sure your boot and crampon choice is good for your objective.
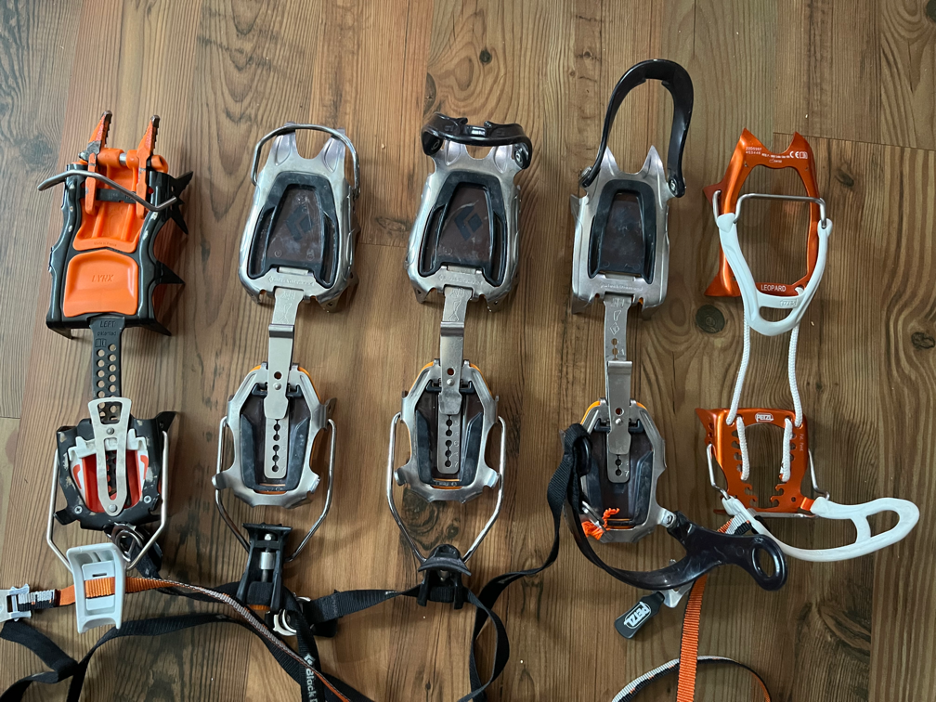
Selection of crampons: Left to right: Petzl Lynx crampons, BD sabretooth, BD sabretooth (different binding), BD contact, Petzl leopard.
Parts of the crampon: Crampons can be split into two different material types, and from that point be split into three different binding systems. There are some models out there that will be a blend of the two materials or have a less conventional attachment system but for most of the models on the market these guidelines will apply. Aside from these differences all crampons have a certain number of features that will be included in all designs.
A- Plastic toe bail – A plastic piece that holds the front of the crampon to your toe. This can work with any footwear.
B- Plastic heel bail – A plastic piece that holds the back of the crampon to you heel This can work with any footwear.
C- Metal front bail – A metal piece that holds the front of the crampon to the front toe welt of a full shank boot.
D- Heel clip - A metal piece that holds the back of the crampon to the front heel welt of a full shank boot.
E- Front points – The two spikes that stick outward from the toe of the crampon.
F- Secondary front points – The two spikes that are set just behind the front points that also stick forward.
G- Front section- The entire front of the crampon.
H- Back section- The entire back of the crampon.
I- Spreader bar- the link that holds both sections together, this is also where the length of the crampon is adjusted.
J- Ankle strap- A strap connected to the heel strap or heel clip of the crampon, this is either used to hold the crampon to the foot or to hold the crampon to your leg if it falls off.

Materials: Crampons will usually be made from either aluminum or steel, each material has its pros and cons, but when in doubt go with steel. Aluminum crampons are more of a tool only for ski mountaineering. The only advantage aluminum has over steel is that it is light weight. While aluminum crampons are great to keep the weight off your back when not in use on a ski mountaineering tour, the points dull very fast, they don’t penetrate into ice as well as steel, and the aluminum can break or bend relatively easily. Many people have bent their aluminum points while walking on ice or rock and have had to turn around. That’s not to say aluminum crampons are totally useless, just that they are more of a specific tool for ski mountaineering. Some crampons for ski mountaineering are a hybrid in which they have aluminum rear sections and steel front sections and front points where it really matters.
Steel crampons are the true work horses of crampons, they can be used for anything from glacier walking to overhanging dry tooling. The material is very robust, and it has the added benefit of being able to be sharpened, this way you can keep your front points ready to be kicked into ice. For the sake of this article the recommendation will be to always go with a steel crampon.

Examples of a fully steel crampon (left), and a fully aluminum crampon (right.)
Crampon points: Nearly all crampons on the market can be divided into 10- point and 12- point. There are a few outliers that may be 8- points, or 14- points, but most crampons will fall into the 10-12. The number of points you have isn’t super important but when shopping for your first pair it can be useful information to know. 10- point crampons are for general non- technical mountaineering; they often have a simpler binding system to fit a wider range of footwear and aren’t as sharp as a more climbing oriented crampon. 12- point crampons offer an extra set of spikes for penetration, and the points are generally sharper to allow for better penetration onto ice, the binding system is more specific and holds itself better to your boot to allow better climbing performance. Most 12- point style crampons need to clip onto a mountaineering boot that is specifically made for crampons.

Examples of 10- and 12-point crampons: Petzl Lynx (left) is a 12- point, and the Black Diamond Contact (right) is a 10- point.
Binding systems: There are three main styles of binding systems in the world of crampons: strap, semi- auto, and full- auto.
Strap: strap crampons can be put on any mountain footwear; the crampon is held to the user’s boot by virtue of a strapping system that encompasses the top of the boot. These are often 10- point crampons and are used for mostly walking and non- technical mountaineering. These crampons have a plastic toe and plastic heel bail.
Semi- automatic: Semi-automatic crampons exist to bridge the gap between strap crampons and full- automatic crampons. They have a heel clip in the back that is designed to clip onto the heel bail of a three-quarter shank mountaineering boot. The front section of the crampon still has a plastic toe bail, these crampons will not fit on anything other than a three- quarter shank or a full- shank mountaineering boot.
Full- automatic: These crampons are made to give the greatest attachment and performance for climbing. They display a metal front bail on the toe and a heel clip in the back. These crampons only work on boots that have a heel bail and a toe bail, also called a full- shank mountaineering boot. The boot itself has no flex to better facilitate support when standing on the tips of your toes. This crampon/ boot combo is reserved for technical ice climbing, steep snow climbing, and higher altitude mountaineering. Many people will also elect to use this set up for non- technical mountaineering routes when icy because of the higher control and warmer boots. Full- automatic crampons are the most popular set up for guide services, ice climbers, winter climbers, and high-altitude mountaineers.

Examples of the three main binding systems: Left to right: BD Sabretooth – full-automatic, BD sabretooth Semi- automatic, BD contact Strap on.
Which crampons should I use: Choosing a crampon ultimately comes down to terrain. If one is planning on climbing a non- technical route like Avalanche Gulch on Shasta, they may choose a full- shank boot to wear. A full- shank boot can have any crampon attached to it, since it’s only walking up hill with very little technical terrain that boot could be paired with a strap crampon. The crampon choice doesn’t matter as much because of the boot. However, if one wanted to climb a more technical route, like the Hotlam Glacier on Shasta, they would want to keep their same boot but up the crampon to something like a full- automatic. There will be more time spent front pointing up the route, and in general more performance will be expected out of the gear so a tighter more performance fit will be needed to safely get up and down.
In general, I stick to these guidelines:
- Thick hiking boot paired with a strap crampon.
- Three- quarter shank paired with a semi- automatic crampon.
- Full- shank paired with a full- automatic crampon.
The thick hiking boot would be used on day hikes and backpacking trips with just a little bit of snow to cross here and there, but not to be used on anything where the hiker will be walking for hours in crampons on snow or ice.
The three- quarter shank combo is used best in alpine terrain that is mostly rock climbing but still has sections of easy ice, snow, and or glacier travel. Since the shank doesn’t extend all the way to the end of the boot it makes for easier rock climbing. I personally am very selective of when I use this combo, if the weather is colder or the altitude gets too high, I will switch to a warmer option.
The Full- shank combo I use for volcanoes, ice climbing, non- technical glaciers, and winter mountaineering. The boots provide the most amount of insulation to keep my feet warm, and the crampons hold the best to the boots when climbing or doing icy traverses.
In the end, this entire article’s main theme is it’s best to have a quiver of ice axes and crampons so you can best pick the right tool for the job. Having a person or business to ask questions about a specific trip to see if the gear you already have is good enough is a great place to start. Think about your mountaineering goals and what would be the best equipment to buy so you can achieve them, this article was demonstrating the best tools for the job. In the end a lot of gear can still get you up your climb even if it’s not the best performance. It’s a balance between having the best tool for the job and not letting the less suited gear hold you back.
by IAG guide Ryan Tilley
AMGA certified Alpine & Rock Guide

