|
Tips & Techniques: Backing up your Rappel Over Memorial Weekend, CAG hosted an Introduction to Traditional Climbing Course that covered three different climbing areas throughout the eastern Sierra. The attending student had prior knowledge of rope climbing within a gym setting and no prior outdoor climbing experience. His goal was to progress his ability to be a safe and effective outdoor climbing partner, as well as promote his movement and technique, so that he may climb outdoors with more experienced climbing partners. Since the grand finale to the course was a multi-pitch route on the East Tower of Granite Basin, the following morning I met up with one of the climbers responsible for developing Granite Basin back in the 70s. Over coffee, he recounted stories of the initial development of the Granite Basin climbing area, and we both shared stories of our unique introductions to the sport of Climbing. Contrary to both our experiences, today’s generation is often introduced to climbing within a Gym setting, and may choose at some point to transition into climbing outdoors, or not. After reviewing the course curriculum, my friend and I agreed that much of the techniques reviewed during the course we similarly learned (too) many years after we’d started climbing outdoors. During our hour of reminiscing, I asked my friend at what point in his 40+ year climbing career he learned how to escape the belay, to which he replied, “Escape What?” A few days later I shared a bench with another prominent figure in the climbing community while internetting in Yosemite Lodge. I asked him what year he started climbing (1998) and when he learned to escape the belay. “Er, I’d probably be able to figure it out, but no, I don’t know how to do that.” Exactly. While it seems logical that someone interested in becoming more knowledgeable about a sport would take an introductory course e.g. Sailing or Tennis or Kite-boarding, how many of us actually learn the basics of outdoors climbing at an appropriate time, such as when we started climbing outdoors? My first climbing experience was on a low-angle finger crack in Tuolumne, where I learned to (flail) on Yosemite granite while a friend/mentor coached me while free-soloing alongside the route, after which we transitioned into a simul-rappel to expedite our descent. Those first years I went onto simul-rappel off of most multi-pitch routes without awareness of possible dangers. I shudder to think of all the times I rappelled off of one strand without the use of a rappel back-up, perhaps without knots at the end of the rope, especially in an area like Potrero Chico, well-known for loose rock and debris. It was far too long before I learned the basics of safe rappelling, and I am constantly inspired to make rappelling as safe as possible. Perhaps the scenario of needing to remove oneself from a belay doesn’t happen that frequently, but the concept is incredibly helpful to know at any point in your climbing career. Thus, the theme for my first post in the CAG/IAG Informative Blog:
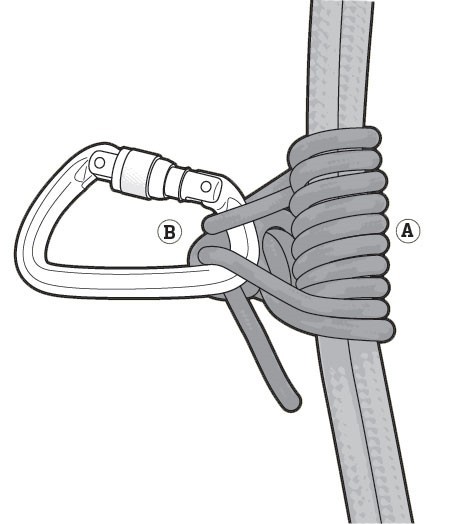
Backing up your Rappel Using an Autoblock off a Leg Loop I dedicate this equipment for its specific use - backing up rappels and lowers - and habitually store it on the aft-most harness gear loop, locked and out of the way from the more easily accessible gear loops near the front. I recommend buying a biner that looks different from the rest of your equipment for quick recognition, and one that weighs next to nothing, so there’s no excuse not to always bring it. Same theory with the material. Pros: Quick and easy to set up
* What has been circulating around the guiding community is a trend towards not using an autoblock off of a leg loop because if the rappeller gets knocked unconscious, they may slump forward, and that motion may push the rappel device down towards their legs, which could cause the autoblock material to get jammed up in the rappel device and render the friction hitch useless. See Using an Autoblock with a Belay Extension for another option to backing up your rappel. Backing up your Rappel Using an Autoblock with a Belay Extension Pros: If set up correctly, this system should alleviate the possibility of the autoblock material becoming jammed in the rappel device because of the increased distance between them. Plus, rappel extensions are convenient on multiple rappels.
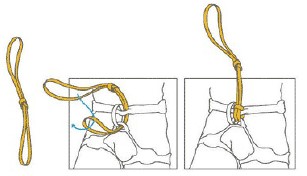
Girth hitch material to harness. Tie overhand knot in middle of material so that when material is extended above you the knot is at chest level.
Next, use distant end of runner as a personal tether, attach to rappel anchor using a locking carabiner. Place rappel device and locking carabiner in loop beneath knot in runner. Next, set up rappel autoblock off of belay loop of harness.
Coming next! Escaping the Belay
|


International Alpine Guides Blog, News and Articles
Guiding the mountains of the world since 1979

PH: 877-686-2546 (MTN-CLIMB)
EMAIL: info@InternationalAlpineGuides.com
Po Box 1461
Mammoth Lakes, California 93546
When in Mammoth Lakes please visit Mammoth Mountaineering for all your outdoor needs:

When in Truckee please visit The Backcountry for all your outdoor needs:
Copyright © 2025, International Alpine Guides. All rights reserved.
International Alpine Guides, California Alpine Guides LLC & Alpine Skills International provide mountain guides, ski tours, mountain climbing, guided treks and rock climbing in the United States & throughout the world and under special use permits from Yosemite National Park, Sequoia/Kings Canyon National Park, Lassen National Park, Inyo National Forest, Humboldt/Toiyabe National Forest, Shasta/Trinity National Forest, Eldorado National Forest & the Tahoe National Forest
California Alpine Guides LLC & International Alpine guides also operates under the DBA of Alpine Skills International.
“In accordance with Federal law and U.S. Department of Agriculture (USDA) civil rights regulations and policies, this institution is prohibited from discriminating on the basis of race, color, national origin, sex, age, disability, and reprisal or retaliation for prior civil rights activity. (Not all prohibited bases apply to all programs.) Persons with disabilities who require alternative means of communication for program information (e.g., Braille, large print, audiotape, American Sign Language, etc.) should contact the responsible State or local Agency that administers the program or USDA’s TARGET Center at (202) 720-2600 (voice and TTY) or contact USDA through the Federal Relay Service at (800) 877-8339. Additionally, program information is also available in languages other than English. To file a complaint alleging discrimination, complete the USDA Program Discrimination Complaint Form, AD-3027, found online at http://www.ascr.usda.gov/complaint_filing_cust.html, or at any USDA office or write a letter addressedto USDA and provided in the letter all of the information requested in the form. To request a copy of the complaint form, call (866) 632-9992. Submit your completed form or letter to USDA by: (a) mail: U.S. Department of Agriculture Office of the Assistant Secretary for Civil Rights, 1400 Independence Avenue, SW, Washington, D.C. 20250-9410; (b) fax: (202) 690-7442; email: program.intake@usda.gov.” “USDA is an equal opportunity provider, employer, and lender.”
Site Design: www.sharpenddesigns.com